where I ramble on about what's happening in my little world
and hopefully you have some enjoyment reading about it!


A bit of a mini adventure...

I've been away a while... having a mini adventure... well, I've been about a bit and seen a lot of mini-ing things...
Firstly, a huooge thanx to the lovely mini-ing friends that I met up with at Kensington Doll show, for making it more than just a great day out, so much giggling... definitely one of the best days out with friends I've ever had!


(I'm the one in brown trying to breathe in and not make my tummy look quite so humungus, others opted for the 'hide the belly' game in other ways! LOL)
We met up afterwards with some other friends too who had stalls at the show and I returned home feeling quite inspired to get mini-ing again.... and then I helped move my son from one flat to another and was too tired to even think about mini's for a few weeks!!!

I'm really enthused now tho as I've just had a nice holiday on the Isle of Wight, and was lucky enough to go to Godshill Miniature Vilage while I was there. If you love miniatures and you've never been, it's REALLY worth a visit! I thought I loved my dollhouses, but when you see the workmanship that goes into these buildings that live outside permanently, well... its starts ya thinking in a whole new light!

(if you poke the pictures, they will pop up bigger for a better look)

we wondered just how accurate it was... so we walked up the hill afterwards to see the real version of the church and houses and its a suprisingly good likeness!

I snapped this with my mum in the foreground as a reminder that this is the real version LOL

this is my daughter crouching to take pics of the shopfronts


(I'm too decrepid to crouch nowadays LOL)

Most of the village is in 10th scale but theres even a model of the model village in the model village at 1:100 / 1:1000!


the miniature buildings were incredible , but the landscaping was equally as impressive, over 3000 trees and shrubs are manicured regularly to keep this looking as great as it does.


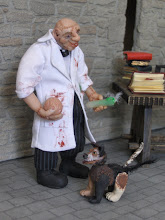
I even spotted a little peep doing some decorating/maintenance!!!

hubbs spotted other things, trust him to ask the question.... can you spot Erica Rowe? :D


(for those who need a clue... she was a topless streaker! LOL)

and of course the village pub... in miniature

and real... its never a proper holiday without a stop off in one or two :D

We did so much last week but still found a bit of time to relax,

have a paddle,
and stop to smell the flowers.... well, the ones without bees in anyway! LOL


oh and the yummys.... can't forget them!

... back on the diet again for me methinks LOL


Photobucket

Anyone seen my mojo? & new little things

My mini-ing mojo has run away!!! has anyone seen it? LOL I have no idea when it last graced me with its presence but it's been far too long since I felt like I wanted clay in my hands & I'm beginning to feel a bit 'lost' now.
I'm hoping that the school holidays will encourage my daughter off the playstation and into getting messy in the craftroom thus kick starting my creative mojo once more, I do have a few other bits & bobs keeping me occupied though and seem to be quite content at the moment with knitting needles in my hand, so maybe the mini-mojo was hijacked, & hidden away somewhere by the knitting fairy instead? After all, over the last month, I've also been to watch the Rugby @ Twickenham and spent a few days in London sightseeing /going to a concert so havn't really had a great deal of spare time anyway!
I have still had my eyes on minis, and have had some lovely mini things appear through my letterbox from some of my even lovelier blogging friends :o)

...some hatpins from Glenda of Peppercorn Minis, for Granny Weatherwax's hat, although she needs considerably more coverage than just her hat as she's been naked for about 18 months now... crivens!!!!

...and some cute little cutters from Julia of Bearcabin Miniatures.

I 'just' need to mix up some gingerbread coloured clay and make some biscuits to go into my Santa's shop/house :o)

...and I won Kat the Hat's red nose day hat

which looks good whatever side you look at it from
she sent me some other bits too ... I love the little black straw bowler and WHEN my mojo returns I shall have to make some-one to fit it as its a perfect size for a trainee witch - its just too nice to spend its life on the end of a bed :o)

the adorable little newly hatched sleeping dragon was made by the dragon queen, Nicky Cooper and is just SO detailed... the picture doesnt do it justice at all!

oh well, thats about it from me for now, I have a mojo to find & more procrastinating to do!

Photobucket

another blog

No new minis for a bit, I've been distracted by other 'stuff' in my creative stash.... anyways, I don't want to clutter up my mini's page with my stitching stuff so have made a page specific for my textile & yarn ramblings, & thought I'd put a link to my other blog on here for anyone thats interested "stitching the stash"

I'm a bad blogger at the best of times so heavens only knows how I'll cope with managing 2 blogs LOL

Photobucket

paperclay & filler exterior tutorial

Apologies for promising a tutorial & then leaving you waiting!
I am very easily distracted and decided (in my infinite wisdom) over the school holidays, to learn how to knit and it sort of took over for a while... I have now put the needles down and am back... for a bit.

OK so in my last post, some of you out there in blogland wanted to know how I acheived this look


heres a glimpse into how I did it.

For this project I have used ordinary ready made household decorating filler & 'creative' brand paperclay but note, this paperclay is very difficult to get hold of in the UK! if anyone knows of a current UK supplier PLEASE let me know! as import taxes make this product as rare as hens teeth here! I'm sure the same principals will work with other air dry brands of clay.

Roll out your paperclay between two pieces of cling film wrap, to a depth of approx 2 mm.
Rolling between clingfilm stops it sticking to your surface & your roller.


then, using a ruler gently mark out lines of 1/4 inch wide to indicate the bricklines, and mark the width of the bricks at 3/4 inch in length. Stagger /alternate the bricks on each row until it looks like the pic below. This represents the equivalent of a 3" x 9" typical housebrick. For other sized bricks adjust dimensions to suit.
Be careful not to cut through the lines.

then using an embossing tool or something similar with a small rounded end, follow your score lines and smooth off to make the grout lines.

cut along the brick lines, into random shapes

use PVA to glue these shapes onto the surface you are wanting to cover, starting along one edge rather than in the middle. Smooth the very edge of the clay down a little to help the adhesion to both the surface and for the layer of filler to be added to over this edge.


I then mark out a grid to follow so that my bricks line up a bit more accurately as when I've not done this step it doesn't quite look right. I must be one of life's 'picture straighteners' as I can usually spot something not lined up right and it irritates me until its straightened LOL

Stipple the paperclay bricks using an old brush to add some texture to the clay.

Next the colouring. This is all a matter of personal taste, I prefer grey toned grout lines as it just looks more weather worn to me, but any colour you like can be used, as per the the bricks too.

I coloured my bricks using a mix of watered down 50:50 burnt umber and burnt sienna acrylics with a grey grout line painted in with a fine brush. The last bit of the brick painting gets done after the final wash has been applied.

I forgot to photograph this bit sorry :o( but fellow blogger Michelle from Michelles Mad World recently did a post on paperclaying exteriors too, and has covered the painting aspect much better than me anyway! if you need help with the painting step or havnt seen it yet pop over & take a peek here .

The next step I really enjoyed! using a narrow spatula/pallett knife, smooth your readymade filler evenly onto the surface, to the same depth as the bricks. Cover just the edge of your paperclay bricks. Dont worry about getting a super-smooth surface, you dont want that anyway! a few ridges make it look better. (I used ready made filler as it seemed to give a much finer finish than the powdered make it yerself variety)

when adding plaster to the edge of wooden beams, take great care not to let filler dry onto the wood as it will be difficult to remove, so have a damp cloth or damp cotton buds to remove any excess filler from areas its not supposed to be!

add a few cracks along the edges where the 'plaster' has 'fallen off' using a scalpel or sharp knife. The effect will look better once a final dirty wash has been applied as the colour will sit in the cracks and look like dirt accumulated over the years.

then the boring bit... waiting for it to all dry!

It needs to be thoroughly dry before the next step.....

Sand the surface of the plaster with a fine grade sandpaper to remove any sharp edges, nature wouldn't leave these on an old building, so neither should we.

OK, so now its dry and sanded... Mix a wash of brown, grey and even a little green acrylics together and water down. It nees to look like a dirty dusty mud colour to work properly. Try the thickness/colour on a piece of paper or sample piece before adding to your finished piece, to check the desired shade / consistency. Add over the whole side of your work, bricks and plaster, then wipe off from the surface gently with a cloth before it dries. This will remove just the surface 'dirt' leaving the 'dirt' in the areas it would naturally fall into.The final step was to dry brush a litte burnt sienna over the top of the bricks, which catches in the stippled areas giving the red tinge we normally associate with bricks.

You can enhance the look further by adding moss into the cracks or edges of the bricks.

Hope that helps some of you get started on your projects. It's really not as scary as you think, just experiment and you'll be surpised how you work things out as you go along , any questions just ask.


Photobucket

almost done :o)

I had a few hours to myself over the last couple of days, which is rare for a school half term! but my daughter is getting older now and doesnt need (or want) permanent supervision from mum!! LOL so I made some progress on the sewing shopbox whilst the playstation kept her company.

and it went from looking like this....to this.... :o)The bricks were made from paperclay & painted with acrylics, then the rest was plastered in ready made quick drying filler, sanded and then a weak dirty wash applied all over.

I dont like the door it came with as it's just mdf so will make one of my balsa specials for it next... maybe tomorrow? and I want to try out Glenda's idea for a leaded window too, you can see her fantastic tutorial here.
I'm on an urge to get it all finished as I want to make a start on my steampunk mousientists house ... and because it'd be quite novel to actually have something FINISHED for a change!!! :o)

I did take lots of pics while I decorated it, but wasnt sure if anyone would actually want a step by step how to do it with paperclay and polyfilla? let me know if you want to see how it's done.
Photobucket

another project to add to the to-do list!....


just a quick post... I found this whilst out shopping this morning and just HAD to have it !! and it was a bargain too, so home it came :o) as soon as I saw it I thought it was just the right size to turn it into a 2 floored steampunk style clockwork 'dolls'-house/room box 'thing'!
I have a vision for it... (wether it turns out anywhere near the image in my head is another matter LOL) I think I shall put a lift in one corner with cogs and chains etc and on the upper floor will be an observatory, with a pull down/fold up bed contraption. I've been wanting to do something steampunk for a while and now I have the perfect vessel for me to play with :o) I had a chat about this with a few friends and Joolz of Jakdaws attic is going to make me a steampunked mousientist with mad hair, boggly eyes & goggles on, to live in it (when he's not running around the Skool of Majick blowing things up!! )
:o) Happy days ....

I'd love to make a start on the new project but the neverending 'to-do' list insisted I finished some overdue tasks first... so I did a little bit of decorating on the sewing (shop?) roombox instead (little being about right! LOL) painted the ceiling, fitted & painted flooring, bashed the beams about a bit and stained it.

not much to show workwise & not very exciting really, I need to buy some filler stuff to put between the beams on the outside as 'plaster' & I need to spray seal the wallpaper that I printed off for it, but I need to do the spraying outside and today it rained! :o( ... so those are jobs for tomorrow & hopefully I'll show you a finished roombox next time?

back to the to-do list... I did tick some tasks off but now seem to have added more than I removed... c'est la vie!

Photobucket

and now for something completely different...

Not my usual sort of miniatures, but...
A while ago, I discovered the world of "inchies" on another blog and did much covetting, ooo-ing and arrr-ing, googled it... and oh my, it opened a world of mixed media delights upon my eyes!! and then I wanted to have a go too :o) Before miniatures, my first love was always with textiles and stitching so I enjoyed focusing on playing with fabric just for the fun of it again, rummaged in my stash & this is my first attempt.

They say size matters... well an inch wasn't quite big enough for me (no smutty jokes please) and I settled for an inch & a quarter.

some closer views,


Now they're finished I wish I'd added more stitching... maybe next time? I need to find a nice box frame to mount them in now ... nothing's ever completely finished around here LOL

back to my 'to-do list!.....

Photobucket

adding door hinges

As requested by Michelle...
to get your doors to sit flush within the door frame so that no gaps are visible where you've added the door, you have to rebate the hinge into the door, just take a look at your real doors at home.
So here's how I did it... Firstly lightly mark around the hinge to be fitted, I positioned mine about an inch from the base, in line with the brace at the back of the door and the mock strap hinge at the front. You can buy working strap hinges that are all in one.... unfortunately I only discovered this AFTER I'd bought mine :o( so had to do it this way.

then cut/slice this section away using a sharp scalpel (I have no idea if you can get proper mini chisels, but I found this worked well enough for me) as a safety warning... cut away from you (not like I do... I am an accident waiting to happen LOL) Cut away just a 1mm depth or that of the hinge you are fitting.
like this -

Put a drop of superglue on the back of the hinge to keep it in place, but take great care at this point not to allow the glue to get into the hinge or it will stick & remain permanently in that position ! (yep, I found out the hard way)

add the fiddly screw-pins, remember, double sided sticky tape over the end of you thumb is a godsend for keeping the pins where you want them!

at this point I go over any raw bits of the door with a touch up of woodstain, and paint the hinge with a bit of black paint, filling the gap between hinge & strap to make it look like one piece (again, you can buy working straps and save the hassle of this bit). When dry, your hinge should close flat like this :o)

and not be raised at all, perfect for a close fitting.

as you can see... I didnt find the doorknobs! LOL so havn't finished the final fitting bit as it'd be too fiddly adding the knobs once the doors are fitted properly. To fit, I will cut a similar groove from the door frame as done in the first & second step shown, and just apply a thin bit of E6000 glue to the hinge, put into the frame rebate and wait... it takes a while to dry so gives you more working time but this stuff is industrial strength and is much stronger than superglue, so make sure it doesnt get into the working bit of the hinge!!!

I have just had some replacement knobs delivered and am waiting for the paint to dry before fitting them ... and its teatime... and Im hungry, so will show you the final bit tomorrow.

Photobucket