Apologies for promising a tutorial & then leaving you waiting!
I am very easily distracted and decided (in my infinite wisdom) over the school holidays, to learn how to knit and it sort of took over for a while... I have now put the needles down and am back... for a bit.
OK so in my last post, some of you out there in blogland wanted to know how I acheived this look

heres a glimpse into how I did it.
For this project I have used ordinary ready made household decorating filler & 'creative' brand paperclay but note, this paperclay is very difficult to get hold of in the UK! if anyone knows of a current UK supplier PLEASE let me know! as import taxes make this product as rare as hens teeth here! I'm sure the same principals will work with other air dry brands of clay.
Roll out your paperclay between two pieces of cling film wrap, to a depth of approx 2 mm.
Rolling between clingfilm stops it sticking to your surface & your roller.

then, using a ruler gently mark out lines of 1/4 inch wide to indicate the bricklines, and mark the width of the bricks at 3/4 inch in length. Stagger /alternate the bricks on each row until it looks like the pic below. This represents the equivalent of a 3" x 9" typical housebrick. For other sized bricks adjust dimensions to suit.
Be careful not to cut through the lines.
 then using an embossing tool or something similar with a small rounded end, follow your score lines and smooth off to make the grout lines.
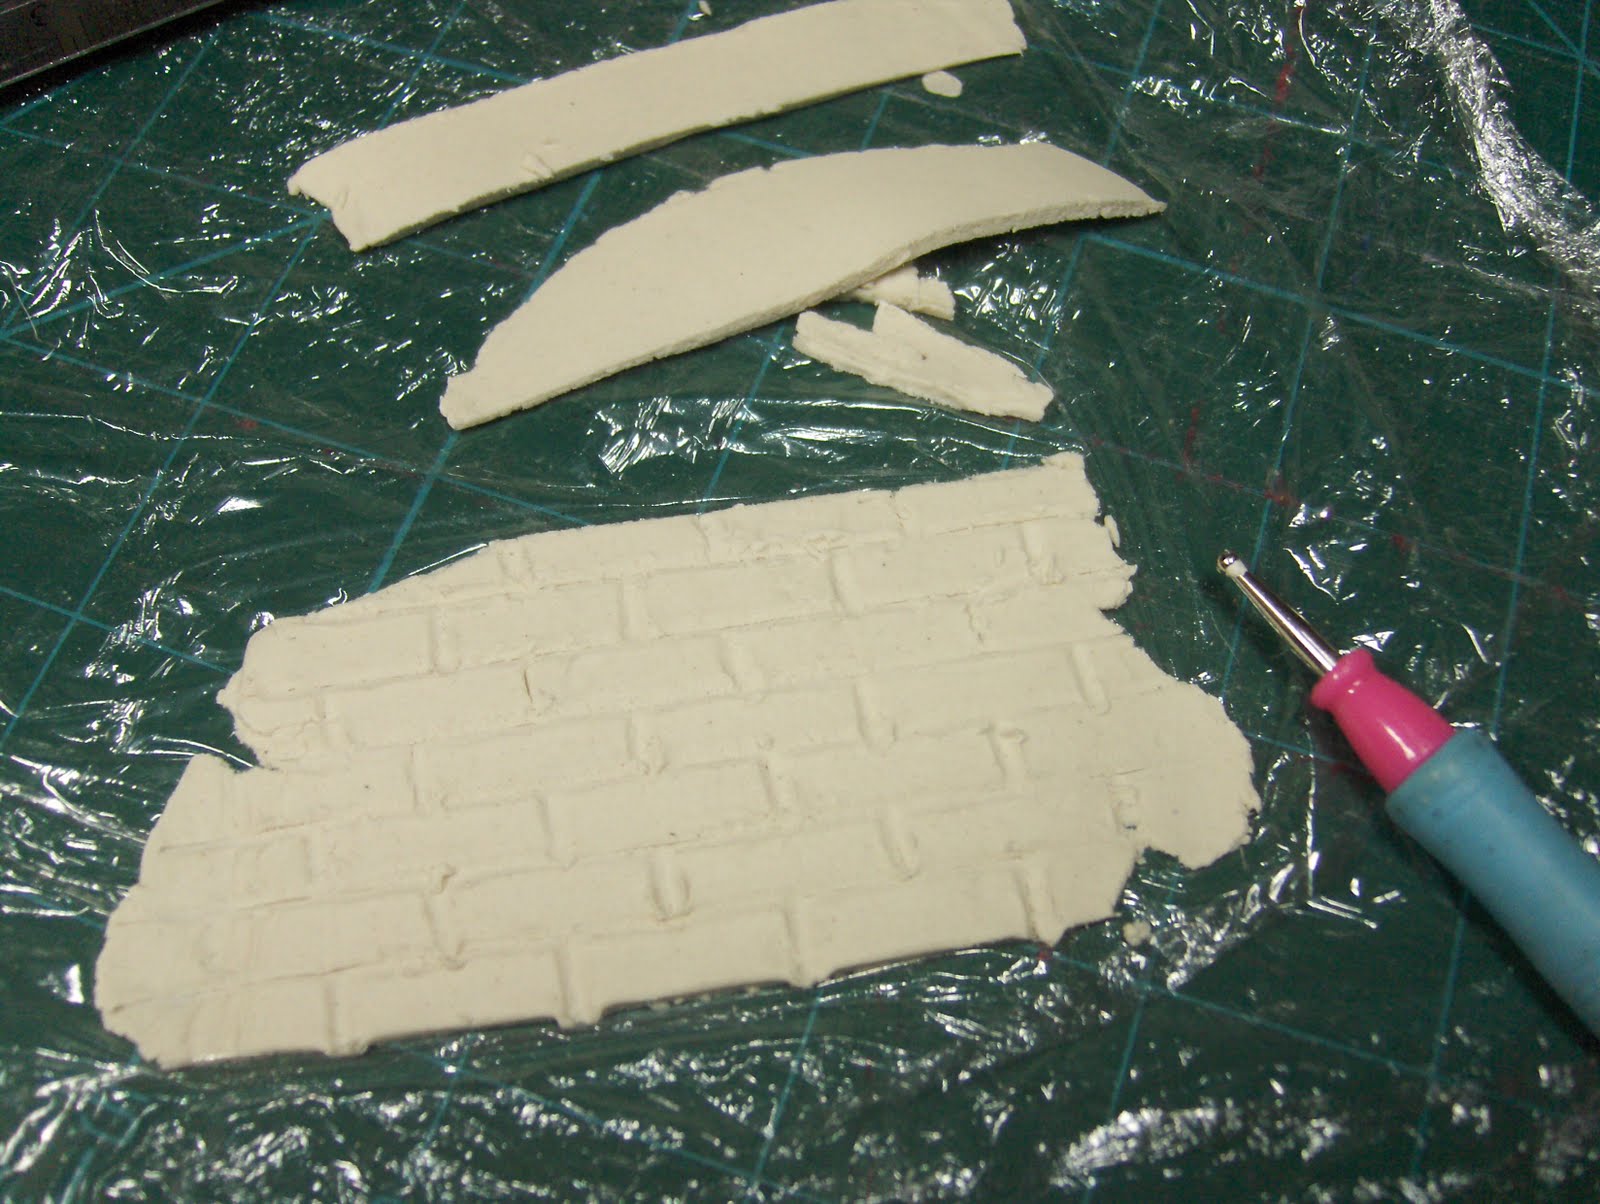 cut along the brick lines, into random shapes
 use PVA to glue these shapes onto the surface you are wanting to cover, starting along one edge rather than in the middle. Smooth the very edge of the clay down a little to help the adhesion to both the surface and for the layer of filler to be added to over this edge.

I then mark out a grid to follow so that my bricks line up a bit more accurately as when I've not done this step it doesn't quite look right. I must be one of life's 'picture straighteners' as I can usually spot something not lined up right and it irritates me until its straightened LOL
 Stipple the paperclay bricks using an old brush to add some texture to the clay.
Next the colouring. This is all a matter of personal taste, I prefer grey toned grout lines as it just looks more weather worn to me, but any colour you like can be used, as per the the bricks too.
I coloured my bricks using a mix of watered down 50:50 burnt umber and burnt sienna acrylics with a grey grout line painted in with a fine brush. The last bit of the brick painting gets done after the final wash has been applied.
I forgot to photograph this bit sorry :o( but fellow blogger Michelle from Michelles Mad World recently did a post on paperclaying exteriors too, and has covered the painting aspect much better than me anyway! if you need help with the painting step or havnt seen it yet pop over & take a peek here .
The next step I really enjoyed! using a narrow spatula/pallett knife, smooth your readymade filler evenly onto the surface, to the same depth as the bricks. Cover just the edge of your paperclay bricks. Dont worry about getting a super-smooth surface, you dont want that anyway! a few ridges make it look better. (I used ready made filler as it seemed to give a much finer finish than the powdered make it yerself variety)
 when adding plaster to the edge of wooden beams, take great care not to let filler dry onto the wood as it will be difficult to remove, so have a damp cloth or damp cotton buds to remove any excess filler from areas its not supposed to be!
 add a few cracks along the edges where the 'plaster' has 'fallen off' using a scalpel or sharp knife. The effect will look better once a final dirty wash has been applied as the colour will sit in the cracks and look like dirt accumulated over the years.
 then the boring bit... waiting for it to all dry!
It needs to be thoroughly dry before the next step.....
Sand the surface of the plaster with a fine grade sandpaper to remove any sharp edges, nature wouldn't leave these on an old building, so neither should we.
OK, so now its dry and sanded... Mix a wash of brown, grey and even a little green acrylics together and water down. It nees to look like a dirty dusty mud colour to work properly. Try the thickness/colour on a piece of paper or sample piece before adding to your finished piece, to check the desired shade / consistency. Add over the whole side of your work, bricks and plaster, then wipe off from the surface gently with a cloth before it dries. This will remove just the surface 'dirt' leaving the 'dirt' in the areas it would naturally fall into.The final step was to dry brush a litte burnt sienna over the top of the bricks, which catches in the stippled areas giving the red tinge we normally associate with bricks.
 You can enhance the look further by adding moss into the cracks or edges of the bricks.
Hope that helps some of you get started on your projects. It's really not as scary as you think, just experiment and you'll be surpised how you work things out as you go along , any questions just ask.